Monday, May 30, 2011

Bannack: Favorites


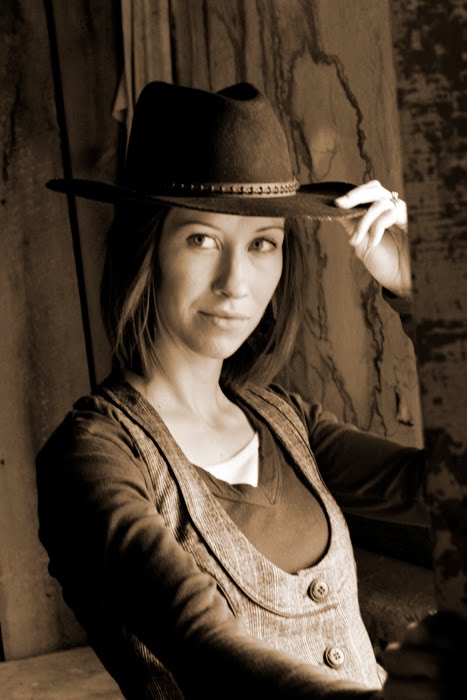
1. Sepia: 5.25.11; 3:30pm; Bannack, Montana; f5.6; 1/40; Canon Rebel T2i; Manual
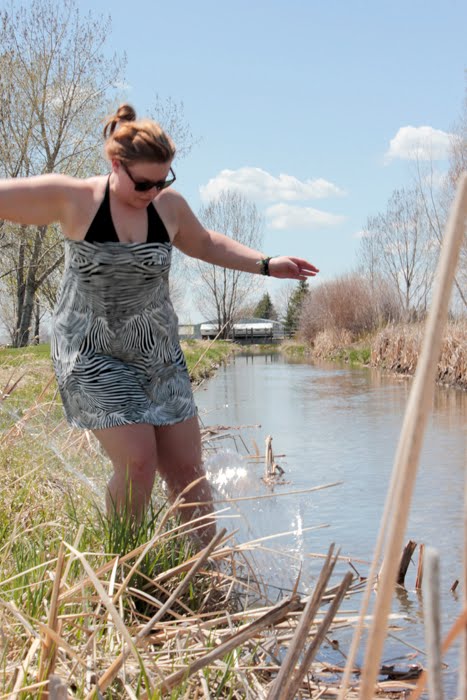
2. Black & White: 5.25.11; 2pm; Bannack, Montana; f5; 1/100; Canon Rebel T2i; Manual
3. Connor: 5.25.11; 1pm; Bannack, Montana; f9; 1/400; Canon Rebel T2i; Manual
4. License Plates: 5.25.11; 10am; Bannack, Montana; f5; 1/800; Canon Rebel T2i; Manual
5. Mad Dog: 5.25.11; 11am; Bannack, Montana; f5; 1/30; Canon Rebel T2i; Manual
6. Rope: 5.25.11; 12pm; Bannack, Montana; f5; 1/1000; Canon Rebel T2i; Manual
7. Ghost: 5.25.11; 2pm; Bannack, Montana; f18; 5 seconds; Canon Rebel T2i; Manual

These were all favorites for very different reasons. However I think lighting was a huge part of all these images. I loved the natural lighting that came through windows and deteriorating roofs. I also really liked capturing the texture of Bannack Ghost town. It had a lot of interesting textures as wood rotted and paint flaked off with age. The black and white edit was done in Camera raw and a light vignette was added. The sepia edit was done in Photoshop with an adjustment layer. Other minor edits were done including saturation and levels.

Bannack: HDR


1. Underexposed: 5.25.11; 11am; Bannack, Montana; f5; 1/500; Canon Rebel T2i; Manual
2. Exposed: 5.25.11; 11am; Bannack, Montana; f5; 1/640; Canon Rebel T2i; Manual
3. Overexposed: 5.25.11; 11am; Bannack, Montana; f5; 1/4000; Canon Rebel T2i; Manual


1. Original: 5.25.11; 12pm; Bannack, Montana; f5; 1/40; Canon Rebel T2i; Manual

Dynamic Photo HDR is a great HDR program. I most often used the extreme contrast option because it was the most realistic of the HDR options. I also played around with lowering the saturation defaults. Often times the default saturation levels are too high and make the photo look really fake. I also tried doing one HDR in Photoshop. It is not as useful because there are not as many options in Photoshop, but realistically that is probably the program I will have the most access to so I thought I would learn how to do it. I love the lighting that can be achieved with the use of HDR.

Bannack: Macro Abstract


1. Pebbles: 5.25.11; 10 am; Bannack, Montana; f9; 1/800; Canon Rebel T2i; Manual
2. Saw: 5.25.11; 3pm; Bannack, Montana; f5.6; 1/20; Canon Rebel T2i; Manual

These two original images were taken at different times during the day, but I thought a blend would be interesting because the similar color shades if the rocks and the metal saw. The image of the saw was taken with a shallow depth of field in a very dark shop in the ghost town. I took both images into Photoshop and created a mask on the texture layer. I used the paintbrush tool to blend and hide the pebbles until I was happy with the product. I also used adjustment layers to adjust levels and saturation.

Bannack: Reverse Shallow Depth


1. Wheel Shallow: 5.25.11; Bannack, Montana; f3.5; 1/100; Canon Rebel T2i; Manual
2. Wheel Deep:5.25.11; Bannack, Montana; f3.5; 1/100; Canon Rebel T2i; Manual

Although the camera settings for these pictures are the same, the effect is very different. In order to achieve the shallow depth of field I put my focus mode on spot metering. This allows the photography to manually focus on one specific piece of the frame and then re-frame to achieve the desired bokeh. In the second image I simple focused on the floor and base of the wheel instead, and then re-framed. Simple edits were done in Camera Raw such as saturation and exposure.

Bannack: Action Blur & Freeze


1. Spins: 5.25.11; Bannack, Montana; f25; 1/25; Canon Rebel T2i; Manual
2.Splashes: 5.25.11; Bannack, Montana; f5; 1/640; Canon Rebel T2i; Manual

I loved taking these pictures. The first one was really fun to blur the background. I actually got on the carousel and took the picture while the subject and I were both spinning. With a small aperture and a slow shutter speed I was able to keep the girl in sharp focus while blurring the background. For the second image I did almost the opposite. In order to freeze the splashes beneath Connor's feet I had to have a large aperture and a very fast shutter speed. This allowed me to freeze everything in the frame. Minimal edits were done to both images in Camera Raw. Splashes was also edited in Photoshop. There was two people in the background distance between the subjects legs. In order to erase them I used the cloning tool to mask them out.

Bannack: Portraits


1. Widow Drink: 5.25.11; Bannack, Montana; f5.6; 1/80; Canon Rebel T2i; Manual
2. Bartender: 5.25.11; Bannack, Montana; f5; 1/200; Canon Rebel T2i; Manual
3. Brittany: 5.25.11; Bannack, Montana; f5.6; 1/60; Canon Rebel T2i; Manual
4. Hunter: 5.25.11; Bannack, Montana; f.5.6; 1/60; Canon Rebel T2i; Manual
5. Pink Tub: 5.25.11; Bannack, Montana; f.5; 1/25; Canon Rebel T2i; Manual

The Portraits were really fun to do because the lighting was great! Most of these pictures were taken in the saloon with the side light of the window. I tried using fill flash and off camera flashes, but found the best lighting was from nature. All these images were slightly edited in camera raw, but no significant changes were made. I also found that posed pictures had a very different feel than candid shots had. I loved the lighting techniques we learned and found widow light very useful.

Sunday, May 22, 2011

Week 5: Portraits

Individual: Side Composition

1. Lacey: 5.19.11; Rexburg, Idaho; f4; 1/100; Canon Rebel T2i; Manual

Individual: Head Shot

1. Head Shot: 5.19.11; Rexburg, Idaho; f5.6; 1/100; Canon Rebel T2i; Manual
2. Umbrella: 5.19.11; Rexburg, Idaho; f16; 1/25; Canon Rebel T2i; Manual

Individual: Full Body

1. Full Body: 5.19.11; Rexburg, Idaho; f5.6; 1/100; Canon Rebel T2i; Manual
2. Sitting: 5.19.11; Rexburg, Idaho; f5.6; 1/100; Canon Rebel T2i; Manual

Group Posed

1. Couple: 5.19.11; Rexburg, Idaho; f4; 1/100; Canon Rebel T2i; Manual
2. Shoes: 5.19.11; Rexburg, Idaho; f5.6; 1/100; Canon Rebel T2i; Manual
3. Legs: 5.19.11; Rexburg, Idaho; f5.6; 1/100; Canon Rebel T2i; Manual

Group Candid

1. Walking: 5.19.11; Rexburg, Idaho; f4.5; 1/100; Canon Rebel T2i; Manual

Environment

1. Churro: 5.22.11; Porter Park-Rexburg, Idaho; f7.1; 1/1000; Canon Rebel T2i; Manual

This photography shoot was really fun! I love the candid shots as well as the posed ones. I tried a lot of different approaches and found that I tend to like the more natural looks. Lighting was hard to make perfect. I learned that lighting is easier to find in nature than to try to adjust or add light. I tried and failed at using my fill flash. Instead I prefer to use natural light at the right time of day. Evening and morning light is the best. I also took many of these pictures on cloudy days which is great lighting. I also played around with motion in the Umbrella shot. No big edits were made. Only simple saturation and lighting adjustments were made in Camera Raw. Models included: Lacey Rock, Jesse Kempler, and Danica Reed.
Week 5: Edits

Color Match


1. Window: 5.14.11; Rexburg, Idaho; f4.5; 1/80; Canon Rebel T2i; Manual
2. Pane: 5.14.11; Rexburg, Idaho; f5.6; 1/160; Canon Rebel T2i; Manual

For these images I used color match in Photoshop. These ability allows the matching of two different images so they appear to be taken in about the same lighting. I chose these two images because the lighting was very different. One was taken inside, one outside. It worked well to bring some color to the window and give the illusions that the images were taken in similar lighting situations.

Color Replace

1. Purple: 5.14.11; Rexburg, Idaho; f5; 1/60; Canon Rebel T2i; Manual

For this image I used Color Replace in Photoshop. First I used the magnet selection tool to select the dress. In order to address all the shades of her pink dress, I used the eye drop tool to select different shades. I then changed both the hue and saturation to get this purple color.

Portrait Enhancements


1. Jesse: 5.19.11; Rexburg, Idaho; f4.5; 1/100; Canon Rebel T2i; Manual

Its hard to see enhancements unless you pay close attention. I smoothed our Jesse's skin with the brush tool and painted in different shades of his skin color using a very feathered and low-flow brush. I also replaced his natural eye color with a blue-ish color. Finally I selected his teeth, used a levels adjustment layer and decreased all the saturation of the yellow hues. His teeth were already white, but this technique made him look flawless.

Saturday, May 14, 2011

Week 4: Photography & Camera Raw

ORIGINAL


ORIGINAL


ORIGINAL


1. Lady: 5.12.2011; Rexburg, Idaho; f5.6; 1/100; Canon Rebel T2i; Manual

There is a story that goes along with this picture. I opened my fridge one evening to reach for my strawberries. I am about to put this particular berry in my mouth when I notice a little friend hanging out on my strawberry. Sadly his (Nelson to be exact) little legs were stuck in a small web, but he was hanging onto life. This little fighter must have been in my fridge for at least two days. Anyways I got excited and grabbed my camera. I had to open my f-stop because the lack of light in my apartment. All edits were done in Camera Raw. They included: levels, contrast, brightness, fill light, and saturation.

2. Toes: 5.13.2011; Nature Park-Rexburg, ID; f20; 1/100; Canon Rebel T2i; Manual

My goal with Toes was to freeze or blur the motion of the water. For this particular shot I closed by f-stop down to 20 because the sun was so bright. I edited this image the most, and did so in Camera Raw. I used basics such as levels, curves, contrast, and brightness. Then I used a gradient tool to add more contrast and a little saturation from the top left corner to the bottom right of the image.

3. Falling: 5.12.2011; BYU-Idaho, Rexburg; f36; 1/4; Canon Rebel T2i; Manual; Camera Stabilized

Unlike the water in the previous photo, my intention with this shot was to blur the waterfall and keep the subject as focused as possible. I was in between classes and didn't have a tripod, so I found a bench and set my camera on it and framed the shot. Minimal edits were done with this image. I used Camera Raw again to give natural enhancements to this photo. Specifically I used saturation, brightness, contrast, and fill light to enhance the image.